One Pan Chicken Sausage and Veggies

IMG_1316

I’m working longer days now. Which in part, I love because it earns me an extra day off per week (I’m working 4, 10-hr shifts). But, when that puts me walking in the door post-workout on a weeknight at 7:30, I don’t want a complicated recipe. (And honestly, who really does on a weeknight!)

I ran across this recipe, actually on Pinterest, a couple months back looking for easier dinner recipes. And this is one of the ones that stuck. We’ve made this several times. Often enough to be honest, that I’m a little embarassed that I haven’t added it on here yet.

IMG_1312

The basis for the recipe is from Chelsea’s Messy Apron. We make it largely as written using one of the pre-cooked flavors of chicken sausage from Trader Joe’s and tons of veggies. It’s probably us more than the recipe, but I usually end up roasting this on 2 separate pans. When the pans are too crowded the food ‘steams’ instead of roasting, and you all know we want the flavor that comes from those browned, roasted veggies.

With the addition of the red pepper flakes, it is a touch spicy. Probably not too much for many adults, but if you were making this for kiddo’s, you might want to back of the amount or leave it off. We typically serve this over brown rice, but you could easily serve over quinoa, couscous, etc.

IMG_1314

Enjoy!

(Printable Recipe)

One Pan Chicken Sausage and Veggies
From Chelsea’s Messy Apron

Ingredients:
1 pkg. pre-cooked Trader Joe’s chicken sausage (5 links)
4-5 small red potatoes
0.75 lb. fresh green beans
2 bell peppers, any color
2 heads broccoli
1/4 cup olive oil
1/4 tsp. red pepper flakes, optional
1 tsp. paprika
1/2 tsp. garlic powder
1 Tbsp. dried oregano
1 Tbsp. dried parsley
1/4 tsp. salt
1/4 tsp. ground black pepper
Quinoa/brown rice/couscous
Grated Parmesan cheese

Preheat the oven to 400 degrees. Line 2 baking sheets with aluminum foil.

For the veggies: cut the red potatoes into small pieces (~1/8 potato) to allow them to cook completely. Seed and chop the bell peppers. Cut the ends off the green beans and cut in half, if needed. Trim the broccoli florets and discard the stems.

Slice the sausages. Add both the sausages and the veggies to a large bowl. Add olive oil and spices, and stir to coat. Divide evenly between the pans. Roast for 15 minutes. Stir each pan and continue to roast for another 10-15 minutes. Serve over your grain of choice and top with Parmesan cheese.

Steel Cut Oatmeal

img_0896

It seems like I keep going on a “break” and then coming back again. I’ve decided that, if nothing else, I’d like to start blogging again as a mechanism of saving the recipes that I make all the time. Let’s be honest. It’s a good referene, especially when I can pull up a recipe while out and about (clarification: I’m at the store and completely forgot to check if I need any ingredients for the recipe I’m making). There may or may not be any frequency to my posts, but here’s hoping the ones that go up are our ‘keepers’.

Both of us start our jobs really early here. The hubbs goes in at 5:30. I start at 6:30. Considering neither one of us are the best morning people, you can imagine that this translates into both of us eat breakfast at work. Over the last few months, we both fell into the habit of grabbing a granola/protein bar for breakfast for convienence. One of the downsides (I realize there are many), I would be hungry again in a couple hours. Regardless of how you look at it, 9:00-9:30 is too early for lunch.

img_0889img_0891

In an effort to get back to more ‘real’ breakfast food, I decided to return to my old breakfast of choice, oatmeal. For years, I would make my own oats at home (usually microwaved) with cinnamon and unsweetened applesauce. I still do this on occasion, however I really enjoy it when I plan ahead enough to have a pot of these steel cut oats prepared.

They probably take 35-40 minutes from start to clean-up, however much of this is hands-off time. The trade-off for that time is that I get 4 servings of pre-prepared oatmeal that just has to be heated up in the microwave at 6:30 in the morning. Perfect. Most of the time, I just reheat, however you can add a splash of milk or water when reheating if you want more of a creamy texture. Top with blueberries (fresh or frozen, if frozen just add before heating) and/or a sliced banana, and I’m a happy (and full) girl!

img_0894

(Printable Recipe)

Steel Cut Oatmeal
Adapted from Two Peas and Their Pod

Ingredients: (about 4 servings)
1 cup steel cut oats
3-1/2 cups water
pinch of salt
1/2 cup of milk or almond milk
1/2 cup unsweetened applesauce
1-2 tsp. cinnamon
1 tsp. vanilla extract

Bring the water to a boil in a large pot. Add the steel cut oats and salt. Stir.

Reduce the heat to medium low and cook for about 20 minutes. You will need to stir the pot occasionally or the oats will stick to the pan.

When the oats start to thicken. Add the milk, applesauce, cinnamon, and vanilla. Stir and continue to cook for about 10 minutes, or until the oats thicken to your desired consistency.

You can serve immediately or measure out into 4 containers. If saving, refrigerate until use. Reheat in the microwave for 1-2 minutes (can add a splash of milk or water if desired). Top as desired. Enjoy!

100% Whole Wheat Pizza Crust

IMG_4945

I did it! The hubbs finally admitted my pizza crust was better than Trader Joe’s. I think it was the bubbles that got him (he loves when there are bubbles in a pizza crust when it bakes).

Either that or the fact that this crust can stand up to some serious pizza toppings.

IMG_4994

IMG_4998

I’m not quite sure why I fell off the pizza dough bandwagon. At one point, when I was blogging more previously, I was pretty good about keeping some dough on hand. The great thing about pizza dough is that you can prep it, allow it to rise for the first time, and freeze it until you’re ready to use it.

This recipe makes 2 crusts, although they end up more of a hand-tossed style on thickness, so you might be able to stretch it into 3 pizzas if you really like a cracker thin crust. There’s a couple things we really like about this recipe. The first is that it is 100% whole wheat. The whole wheat version from Trader Joe’s definitely has its place in our house, but by the list of ingredients, it seems it’s probably about 50:50 whole wheat-white flour. The second is that it is so easy to work with when prepping the pizza. This is actually probably the winning factor for the hubbs since he’s the pizza baking guru in the house.

IMG_4995

Enjoy!

(Printable Recipe)

100% Whole Wheat Pizza Crust
Adapted from Two Peas and Their Pod

Ingredients:
2 cups warm water (110 degrees F)
1-1/2 Tbsp. (or 2 pkts) of active dry yeast
2 tsp. sugar
2-1/2 cups whole wheat flour
2-1/2 cups whole wheat pastry flour
2 Tbsp. extra virgin olive oil
2 Tbsp. honey
1 Tbsp. Kosher salt

In the bowl of a stand mixer, combine the water and sugar. Sprinkle the yeast over the top of the water and let sit for 3-5 minutes.

Add the remaining ingredients to the bowl of the mixer. Using the dough hook, mix on low until the ingredients are well combined and the dough has been allowed to kneed, about 3-5 minutes.

Remove the dough, form into a ball, and place in a covered bowl in a warm, draft-free place. If I am baking anything in the oven, I usually cover the mixer bowl with a towel and set it on the stove top. Allow to rise for 60-90 minutes or until the dough begins to “flatten” on top.

Form into two equal balls of dough. At this point, the dough can be rolled out to be used immediately for a pizza or frozen. If freezing, wrap in plastic wrap and then place in a freezer ziploc bag. Remove from the freezer and allow to thaw at room temperature for 3-4 hours (or overnight in the refrigerator) when ready to use.

Make-Ahead Veggie Breakfast Casserole

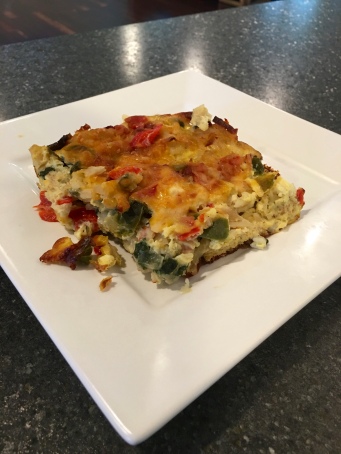
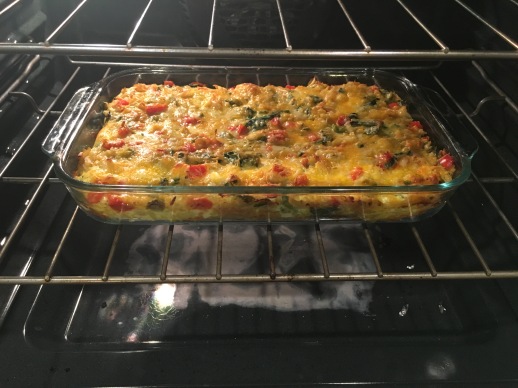
IMG_4915

Last week we had a little “going away” breakfast party for a couple of the guys at work who were leaving us. I work with a pretty big group of people, so it is always fun to do a work potluck where I you to eat a little bit of a whole bunch of different foods!

There were already quite a few people signed up to bring breakfast ‘sweets’ – bagels, muffins, doughnuts. So I was looking for something on the savory side that would be easy to transport. The only caveat to this was due to dietary restrictions, it would be much easier to have the dish be vegetarian. Enter the idea for an egg casserole, except I needed a recipe. My dad has made one growing up, but it always contained Polish sausage and would be a bit plain without the meat.

In a recipe search, I came across this recipe from Sally’s Baking Addiction that looked pretty customizable. Bonus in that it was make-ahead because let me be honest. I already had to bake this and be into work by 6:30 that morning. And I don’t function too well in the morning any earlier than that.

IMG_4873

I mostly used her recipe as a base, swapping and adding things where I thought it might be good. As mentioned above, I did not add any meat, thus I ended up adding some shredded hash browns to the cooked veggie mixture in an attempt to ‘heft’ the casserole up a touch. Other than no mushrooms, I largely followed her veggie list, adding only a jalapeño that happened to be in my fridge. I used normal sandwich bread for the bread in the recipe, although I’m sure any type of bakery loaf you may have would be awesome here as well. Just know that it can work with the bread you normally have in the house too 🙂

On the bake time, I will say to watch it closely. I also baked mine on the longer side, 53 minutes to be exact, as I was concerned about ensuring the middle was cooked (particularly as I had added the potatoes). The eggs themselves were not over baked, however the bottom of the casserole was more of a dark tan color. I might shave a few minutes off that next time and keep it closer to the 48-50min range. Keep in mind, if the casserole has a chance to cool off for a bit, it will seem to ‘set up’ more as well. I cannot speak to reheating as the casserole did not make it until lunch at work, but I have had success reheating egg bakes in the past. Enjoy!

(Printable Recipe)

Make-Ahead Veggie Breakfast Casserole
Adapted from Sally’s Baking Addiction

Ingredients:
1 Tbsp. olive oil
2 bell peppers of any color, diced
1 onion, chopped
1 jalapeno, seeds removed, chopped
2-3 garlic cloves, minced
1 (10 oz) pkg baby spinach
1/3 to 1/2 pkg frozen shredded hash browns
salt and freshly ground black pepper
4 slices of bread (any type desired), torn into bite-sized pieces
10 large eggs
1/2 cup milk
3/4 cup shredded cheddar cheese
Non-stick spray

Warm a large skillet over medium heat. Add olive oil. When warm, add the bell peppers, onions, and jalapeño and sauté for 4-5 mintues, or until crisp-tender. Add the garlic and cook until fragrant, about 1 minute. Add the potatoes and cook until warmed through (this should help get out any extra water). Add the spinach and cook until wilted. Season with salt and pepper to taste. Set the vegetables aside.

Grease a 9×13 inch baking pan with non-stick spray. Add the torn bread in a (mostly) single layer over the bottom of the pan.

In a large bowl, whisk the eggs and milk. Stir in 1/4 cup of cheddar cheese. Sprinkle with salt and pepper. Pour half of the egg mixture over the bread. Top with the vegetables and cover with the remaining egg mixture. Sprinkle the remaining cheese over the top of the casserole.

Spray the bottom of a piece of aluminum foil with non-stick spray. Cover the casserole and refrigerate for at least 2 hours or up to overnight. Remove and allow to come to room temperature prior to baking.

Preheat the oven to 375 degrees. Bake the casserole, uncovered, until the top is golden, the edges are crispy, and the middle appears to be set or about 40-50 minutes. Allow to cool as desired (will ‘set up’ slightly more as it cools).

Baked Chicken and Spinach Flautas

chicken and spinach taquitos topped

Hello all! It’s been awhile. Sorry about that!

Here’s a snapshot of our lives recently: I was in a car accident on the freeway and totaled my Beetle. Thankfully, everyone was fine, with the exception of some wicked burns on my arm from the airbags (The nurses at work dressed my arm as soon as they saw it. Love them!). Car shopping. Definitely not my favorite, although I am happy to report that we finally found one! Eating. Always eating. We never forget that. Preparing for my first triathlon. I completed a sprint, the hubbs an Olympic, and I am proud to say we did pretty well. Now if someone can teach us how to swim faster, we’ll be set. We can both manage the distance, but swim so SLOW!

So back to the  blog. I have some fun things in tow this week. Several Mexican themed recipes. We love Mexican/Southwestern flavors, so giving me an excuse to cook this way only results in us having tacos/burritos/enchiladas/quesadillas almost every night. Hey, no one here is complaining yet. Also in tow is the next chocolate chip cookie bake-off. Should be a good week! 🙂

chicken and spinach taquitos from the side

chicken and spinach taquitos

This recipe from Healthy. Delicious. is actually one that has appeared in my kitchen more than once. The spices. The flavors. These babies just work. The chicken here is simmered in beer before being shredded and mixed with the seasonings. This isn’t the first time I’ve mixed beer with my Mexican dishes. I swear. It makes the best meat! I even swapped out the chicken thighs for chicken breast and it still works. Even if you don’t like to drink beer. Do it. Enjoy!

(Printable Recipe)

Baked Chicken and Spinach Flautas
From Healthy. Delicious.

Ingredients:
1 lb. boneless skinless chicken breasts
16 oz. beer (or chicken broth, but use the beer!)
2 cups water
1 tsp. paprika
1 tsp. Kosher salt
1 tsp. garlic powder
1 tsp. cumin
1 tsp. chili powder
1 jalapeno pepper, minced
3 cups baby spinach, roughly chopped
6-8 large whole wheat tortillas (may need fewer or more depending on the size)
6 oz. Mexican-blend or Pepper-Jack cheese, shredded
cooking spray
Salsa, non-fat plain Greek yogurt for serving (or sour cream).

Preheat the oven to 450 degrees. Spray a large baking sheet with non-stick spray. Set aside.

Place the chicken in a deep sided saute pan and cover with beer and water. Bring to a boil, reduce the heat and simmer for around 10 minutes or until the chicken is cooked through. Remove the chicken from the liquid and shred, but keep the cooking liquid. In a separate small bowl, mix together the seasonings (paprika through chili powder). Mix with the shredded chicken.

Pour out all but 1/4 cup of the cooking liquid. Add the jalapeno and spinach. Cook over low heat for about 2-3 minutes or until the spinach has wilted.

Using whole tortillas, spoon a small amount of chicken closer to one side of the tortilla (1/3 of the way across). Top with spinach and cheese. Roll up the tortilla and place seem-side down on the prepared baking sheet. Repeat with the remaining filling. Spray the other sides of the rolled flautas with nonstick spray.

Bake for 8-10 minutes, turn and bake for another 5-10 minutes or until crispy. Watch them closely as they’ll go from baked to burning quickly depending on your tortillas and oven. Serve with salsa and non-fat plain Greek yogurt (or sour cream).

Lightened-up Almond Granola

lighter summer granola with blueberries

Well, the hubbs has finally joined the Greek yogurt club. The bad news about that was he didn’t forecast this decision. A fridge void of Chobani when that is one of your go-to work breakfast options definitely starts the day off on a sad note. I think it was that night he told me, “Those Chobanis are good. I had 2 the other day!” 🙂

We do tend to go through quite a bit of granola with our morning yogurt. This is one of those recipes that I cannot believe I haven’t shared. This granola is a workhorse in our breakfast rotation, and I have no idea how many times I have made it. Enough that I now essentially have the recipe memorized.

lightened-up granola finished

This recipe is originally from Oh She Glows, and the base of the recipe is still pretty similar to Angela’s although I’ve made a few adaptations to make it fit our tastes. Largely reducing the amount of brown sugar called for in the dry ingredients. We usually like things sweet here, but I promise you won’t notice a difference. As with most granolas, it is pretty easy. Especially so, as the “sauce” portion of this one doesn’t need to be cooked on the stove. The bake time is an estimate of 20-25 minutes, and I find this is true for me as well. Each batch varies just a bit in the time it needs in the oven. Just watch the pieces of oats and almonds. When you see them browning, it is done. The pieces may still seem a little soft, but it will crisp as it cools.

With some Greek yogurt and berries, I could absolutely see this as an addition to Easter Brunch. Enjoy!

(Printable Recipe)

Lightened-up Almond Granola
Adapted from Oh She Glows

Ingredients:
6 cups old-fashioned oats
1-1/2 cups sliced almonds
1 cup uncooked millet
6 Tbsp. ground flaxseed
1/3 cup brown sugar, packed
1-1/2 tsp. cinnamon
1-1/2 to 2 tsp. Kosher salt
6 heaping Tbsp. unsweetened applesauce
3/4 cup honey
1/2 cup plus 1 Tbsp. almond butter
1 Tbsp. vanilla extract
1-1/2 tsp. almond extract

Preheat the oven to 325 degrees. Spray a couple large sheet pans with nonstick spray. Set aside. In a large bowl, combine the first 7 ingredients (oats through salt). Mix well.

In a medium-sized, microwave safe bowl, mix the applesauce, honey, and almond butter. Microwave, for 30 seconds at a time, and stir until the mixture is uniform and smooth. Let cool slightly and add the vanilla and almond extracts. Mix well.

Pour the wet ingredients over the dry ingredients and stir until all the oat mixture appears to be coated with the almond butter mixture. Divide between the prepared pans spreading the granola in a single, even layer in the pan. I usually have to use 3 pans. Bake for 20-25 minutes, stirring halfway. Remove the granola when the pieces begin to brown. It will go from brown to burnt quickly (especially on the edges) so watch it closely. The granola will crisp as it cools.

Baked Oatmeal To Go

baked oatmeal to go close

Anyone have any good tips on how to consistently work out in the morning? With the new job, I’m working longer days, so I’d love to knock my workout out in the morning before work. My problem – this involves being at the gym to workout at 4:30 AM. Doable in my world if I have to do it once. Four times a week… going to be a struggle.

As I think I’ve mentioned before, most mornings, even if I’m not trying to get to the gym before work, there is not much of a chance that I am going to have time to actually cook something. I tend to get out of bed at the last possible minute to give me enough time to get out the door, so grab and go is a great philosophy in this house. With my much earlier mornings in mind, I pulled this recipe out for some make-ahead breakfasts and was surprised to realize that I had yet to blog on it.

baked oatmeal to go in pan

baked oatmeal to go

The recipe is from Leanne of Healthful Pursuit, and I have already lost count of how many times I have made these. They bake in a muffin pan to allow for individual servings, and at 2 “muffins” a morning, one recipe lasts most of my week. They keep well in the refrigerator, and I just reheat them after I get to work in the mornings. They smell great coming out of the microwave due to the cinnamon, and I often get comments asking what I am eating. One thing to note, the texture of these is going to be different from a traditional muffin. With oats, little fat, and no flour, you will not get a traditional crumb. The other thing about these is the batter. It will seem a little runny. Do not worry. They will bake together. I use an ice cream scoop to spoon it into the muffin liners and fill them as full as I’d like my muffins to be. No need to worry about the 1/2 to 2/3 full rule here. As far as add-ins, one of my favorite things to add into these are blueberries. I add them to the batter rather than just as a topping, and I have had success using both fresh and frozen berries.

I made a batch of these this morning for work Friday and this weekend, so we will see if I get any comments at my new place. Maybe looking forward to breakfast will actually get me to the gym at 4:30 on Friday morning? Enjoy!

(Printable Recipe)

Baked Oatmeal To Go
Adapted from Healthful Pursuit

Ingredients:
1 egg or 1 flax egg (1 Tbsp. ground flax seed mixed with 2 Tbsp. warm water, sit for 5 minutes)
1 cup unsweetened applesauce
1 over-ripe banana
1-1/4 cup unsweetened vanilla almond milk (could use any milk)
2 Tbsp. maple syrup
1 tsp. vanilla extract
2-1/2 cups old-fashioned oats
2 Tbsp. ground flax seed
2 tsp. cinnamon
1-1/2 tsp. baking powder
1/4 tsp. Kosher salt
1/2 to 1 cup blueberries, fresh or frozen (or other desired mix-ins)
muffin liners

Preheat the oven to 350 degrees. Line a muffin pan with muffin liners. Set aside.

Place the egg/flax egg, applesauce, banana, milk, maple syrup, and vanilla in blender or food processor. Blend until just combined.

Place the dry ingredients (oats through salt) in a large bowl. Mix to combine. Pour the wet ingredients over the dry ingredients. Mix until just combined. Fold in the blueberries or other mix-ins. Spoon into the muffin liners using an ice cream scoop. It is okay to fill the liners pretty full. The muffins will only rise slightly while baking. There should be enough batter for 12 muffin cups.

Bake for 25-30 minutes or until a toothpick inserted into the center comes out clean. Eat warm or cool completely and store in the refrigerator until needed. To reheat: remove the liner and rewarm in the microwave for about 1 to 2 minutes.

SRC: Sweet Chili Lime Chicken with Cilantro Couscous

sweet chili lime chicken with cilantro lime couscous

My blog assignment this month for SRC was Shelby’s blog The Life & Loves of Grumpy’s Honeybunch. While I had heard of GHB (as she calls it) before, Shelby’s blog was still relatively new to me. I can honestly tell you that I loved it. She has a great list of recipes, and her stories in each post really can’t be beat. 

While I still really want to make this banana bread, the recipe I picked for SRC is her Sweet Chili Lime Chicken with Cilantro Couscous. The hubs and I love anything remotely “southwest” flavored, so I was confident it would be a hit. I did end up using the “puspus” as Shelby indicates Grumpy calls it. Rice would work great too, but you just can’t beat the 5 minute cook time of couscous!

sweet chili lime chicken couscous
sweet chili lime chicken
I followed her recipe pretty close, subbing only brown sugar for the white sugar and adding a little lime juice to the couscous as well. I also left my chicken breasts whole, mostly because I felt like it that day. If you leave them whole, be sure to pound them a bit with a meat tenderizer. Chicken just seems to cook so much more evenly that way! As for the dried pepper flakes, I added just 1/2 teaspoon, and there was a fair amount of heat in the dish. My only advice would be to add slowly. Once the spice is in, you won’t get it out (I have learned this the hard way in the past…).

Enjoy the dish and be sure to stop by GHB to say hello! 

(Printable Recipe)

Sweet Chili Lime Chicken with Cilantro Couscous
Adapted from The Life & Loves of Grumpy’s Honeybunch

Ingredients:
2 chicken breasts, pounded even with meat tenderizer
salt and pepper
1 Tbsp. olive oil
6 Tbsp. low-sodium soy sauce
3-4 Tbsp. brown sugar
1/2-1 tsp. red pepper flakes
juice of 1 lime
zest of 1 lime

Cilantro Couscous:
1-1/4 cup vegetable or chicken broth
1 cup whole wheat couscous
3-4 Tbsp. chopped cilantro
juice of 1/2 lime

Heat a non-stick skillet over medium heat. Warm the oil in the skillet. Pound the chicken breasts until even. Season with salt and pepper. Cook in the pre-heated skillet until cooked through. Remove to a plate and keep warm.

Meanwhile, combine the soy sauce, brown sugar, red pepper flakes, lime juice, and lime zest in a small bowl. Stir until the sugar has dissolved. When the chicken is finished cooking, pour into the hot skillet and bring to a boil. Cook for 3-4 minutes or until the sauce is beginning to reduce. Return the chicken to the pan, cooking for 2-3 more minutes and turning the chicken breasts to coat.

For the couscous, bring the broth to a boil in medium saucepan. Remove from the heat, add the couscous, and place the lid on the pan. Let sit for 5 minutes. Remove the lid and fluff with a fork. Stir in the cilantro and lime juice. Serve with the chicken.

Cajun Pizza

cajun pizza close

Pizza… it almost makes a weekly appearance at our house. Especially if the hubbs is on the schedule to cook dinner on any given night (I have to admit, he’s getting pretty good at it). I’ve mentioned before that I’m on a seemingly never ending hunt for a great whole wheat pizza crust recipe, and I finally think I may have found one that works for us. It doesn’t puff up around the edges of the pizza quite as much as my crusts with traditional flour, but it’s meeting all of my other criteria, including holding up to lots of toppings. We’re currently still in the testing mode for that one, but I’ll be sure to share it after I decide if it’s a keeper!

cajun pizza slices

This pizza idea comes from Alex and Sonja at A Couple Cooks. It has relatively simple toppings, but the result is a pie that comes together in all the right ways. As much as we make different pizzas, I can tell you that we’ve already made this one more than once. In the recipe, a simple sauce is made with crushed tomatoes, garlic, and the Cajun seasoning. I’ve made it that way and with some homemade pizza sauce stocked in my freezer (with the Cajun seasoning added) and had good results both ways. The amount of Cajun seasoning to use is highly adjustable. Add it to your tastes!

Who can say not to a colorful, slightly spicy,, delicious pizza? Definitely not us! Enjoy

(Printable Recipe)

Cajun Pizza
From A Couple Cooks

Ingredients:
1 pizza dough

Sauce:
1/2 cup sauce + Cajun seasoning or
1/2 cup crushed tomatoes 
3 garlic cloves, minced
Cajun seasoning, to taste

Toppings:
1/2 cup shredded Gouda cheese
1/2 cup shredded part-skim Mozzarella cheese 
1/2 cup jalapeno, diced
1/2 red onion, thinly sliced or chopped
1 green bell pepper, diced
1/4-1/2 cup frozen corn, thawed

Preheat the oven to 450 degrees with a stoneware pizza pan in the oven (if using).

Roll out the pizza dough on parchment paper. Set aside. Combine the sauce ingredients, adding the garlic only if using the plain crushed tomatoes. Spread the sauce over the top of the pizza dough leaving a small boarder around the edge. Add the vegetables and sprinkle the cheese over the top. 

Slide the pizza onto the hot stoneware pan (leaving the parchment paper between). Bake for 10-15 minutes or until the crust is slightly browned and the cheese has melted. Cut and serve warm.

Cajun Bulgur Salad

cajun bulger salad

The thing about longer, warmer summer day is that they make me crave lighter, fresher foods. When I am hot, the last thing I want is a heavy, greasy meal that is going to weight me down. In line with this, one of our favorite types of meals in the summer is what I call a “grain salad.” The formula is pretty simple: cooked whole grain + chopped veggies +/- beans/chicken + /- herbs + vinaigrette dressing. The combinations are endless, and they also make for great “clean out the refrigerator meals.”

This grain salad is one that I ran across last summer on A Couple Cooks. We’ve made it several times in the past year, enough that I feel justified in sharing it. You may notice in the pictures that our beans were much lighter than a traditional kidney bean. Like I mentioned before, one of the great thing about this type of meal is the adaptability! This recipe is a little different from some of the others in that it does call for a special spice – Cajun spice blend. Buy it. Even if you don’t have another recipe using it. I promise it will go to good use. Enjoy!

cajun bulger salad layered

(Printable Recipe)

Cajun Bulgur Salad
From A Couple Cooks

Ingredients:
1-1/2 cups uncooked bulgur wheat 
1 can kidney beans, rinsed and drained 
3 ears of corn (or 1/2 cup thawed frozen corn)
1 green bell pepper, chopped
3/4 cup cherry tomatoes, cut in half if larger
1/2 cup red onion, chopped (about 1/2 medium-sized onion)
2 Tbsp. fresh oregano, minced
4 Tbsp. apple cider vinegar
2 Tbsp. olive oil
~1 Tbsp. Cajun spice blend (depends on brand of spice and heat level desired)
fresh ground black pepper
Kosher salt (if needed, may be salt in the spice blend)

Heat 1-1/2 cups water in a medium saucepan to a boil. Add bulgur to the saucepan, cover, and remove from heat. Let the pan sit undisturbed for about 15 minutes. The bulgur will absorb the water as it sits. After 15 minutes, remove the lid and fluff the bulgur with a fork.

Meanwhile, prepare the vinaigrette by whisking together the vinegar, olive oil, oregano, 1/2 Tbsp. Cajun spice blend, salt and pepper. Set aside. Prepare vegetables and rinse and drain the beans if using canned beans. When the grain has finished cooking, add the bulgur and vegetables to a large bowl. Toss to combine. Drizzle with the vinaigrette and mix well. Add remaining Cajun seasoning, salt, and/or pepper to taste. Enjoy!