Final Countdown to Christmas #2: Peppermint Marshmallows

I’m getting a little late in the day on this one, but it’s still technically Tuesday. Better late than never right? We had a marathon baking session today to almost finish out my baking list, so I should be set for the next few days. 

Marshmallows are something that have been on my “to make” list forever. I have wanted to make them for quite some time, but they seem like one of those things that need an “occasion” such as a camping trip or something along those lines. My “occasion” never came up, so there they sat on the list.

I saw this recipe on What Megan’s Making a couple weeks ago on her 12 Days of Christmas Countdown, and it was perfect. My occasion would be Christmas Eve and the destination for these little goodies was definitely going to be a steaming, hot cup of hot chocolate! 

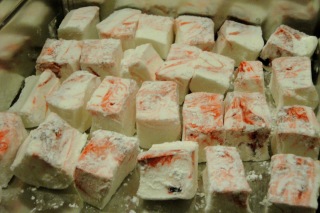
Fast forward a couple weeks, and I’ve actually made these twice. The first time with only a hand-held mixer and the second time in Arizona with my kitchen aid. They worked well both times, but I could definitely see the mixture set up a little quicker using my stand mixer. It almost set up too much as it was really hard to get the pretty red swirls in the second batch. My only advice with this recipe would be to stop the last mixing process if you think they’re getting pretty thick. You want to be able to pour them very slowly not have to press a spatula on the goop to get it to spread out =) However, while my second batch wasn’t quite as pretty, they are still delicious. Try these out! I know that mug of hot chocolate is calling your name!

(Printable Recipe)

Peppermint Marshmallows
Adapted from Martha Stewart and What Megan’s Making

Ingredients:
vegetable oil cooking spray
1-1/2 c. warm water, divided
2 c. sugar
1 Tbsp. light corn syrup
4 pkg (1/4 oz. each) unflavored gelatin
1 tsp. peppermint extract
2 large egg whites

liquid red food coloring 
Line the bottom of a 9 x 13-inch pan with parchment paper and coat the parchment with cooking spray. Set aside. Put sugar, corn syrup, and 3/4 cup water in a small saucepan. Cook over medium heat, stirring, until sugar is dissolved. Stop stirring and let the mixture come to a boil. Raise the heat to medium-high and cook until mixture registers 260 degrees on a candy thermometer. 
Meanwhile, sprinkle gelatin over 3/4 cup water in a heatproof bowl; let stand 5 minutes to soften. Set the bowl with the gelatin mixture over a pan of simmering water. Whisk constantly until gelatin is dissolved. Remove from heat, and stir in extract. Set aside.  
Beat egg whites in the bowl of an electric mixer fitted with the whisk attachment until stiff (but not dry) peaks form. Whisk gelatin mixture into sugar mixture. With the mixer running, gradually add the sugar/gelatin to the egg whites. Mix on high speed until very thick, 12 to 15 minutes or until the mixture looks like it is really starting to thicken.
Pour mixture into lined pan. Working quickly, drop dots of red food coloring across surface of marshmallow. Using a toothpick, swirl the drops into the  marshmallows to create a marbleized effect. Let marshmallow stand, uncovered, at room temperature until firm, at least 3 hours or overnight. Cut into squares using a pair of kitchen scissors. Roll the cut marshmallows in powdered sugar to prevent sticking and store in a ziploc bag or airtight container.

Final Countdown to Christmas: Peanut Butter Temptations

Ever play that game 2 truths and a lie where someone tells you 3 things about themselves, one of which is a lie, and then you have to guess which one isn’t true? Let’s give it a shot. 1) I only have 2 rotations left! 2) I am completely done Christmas shopping and almost done with Christmas baking. 3) I am in Arizona and will be here until after New Years!

Which one is it? Well, as you can probably guess by my lack of posts, I have quite a bit of Christmas baking left to do. As an apology for my absenteeism, I’m putting together a Final Countdown to Christmas baking list for any of you who are finding yourselves in a similar situation. Bring on the butter and sugar!

The first cookie up is one that has been associated with Christmas at my house for as long as I can remember. Definitely well before I was old enough to bake them on my own. When we were kids, my brother and I were responsible for unwrapping the mini Reese’s cups. The only way we could eat any of the candies is if they were smashed, so as you can imagine, we always found quite a few in the bottom of the bag that happened to be “smashed.”

The reason for the perennial appearance of these cookies is more than tradition. They taste awesome and are always well received anywhere I have have taken them. If you are a fan of the peanut butter and chocolate combination, these are a must! You’ll need a mini-muffin pan, but I promise the purchase is worth it. Happy baking! 

(Printable Recipe)

Peanut Butter Temptations
From Mom

Ingredients:
1/2 c. unsalted butter, softened
1/2 c. creamy peanut butter
1/2 c. sugar
1/2 c. packed brown sugar
1 egg
1/2 tsp. vanilla extract
3/4 tsp. baking soda
1/2 tsp. salt
1-1/4 c. all-purpose flour
1 pkg. peanut butter cups

Preheat the oven to 350 degrees. Spray 2 mini-muffin tins with non-stick spray and set aside. Beat the butter, peanut butter and sugars together until light and creamy. Mix in the egg and vanilla extract. Combine the dry ingredients in a small bowl and add to the dough. You may need to add a little bit extra flour until the dough is no longer sticky. Roll the dough into balls and place in the pans. Bake for 8 minutes. The cookies will not look very brown, but they will be cooked through. You do not want to overbake these. 

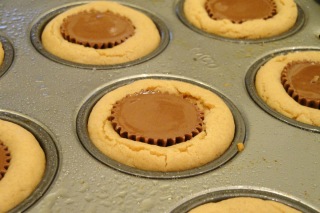
Immediately press a peanut butter cup into each cookie. Cool and let the peanut butter cups set up completely before removing from the pan with the help of a plastic knife. These can be made with 1 mini-muffin pan, but the pan and cookies need to cool completely before baking a second batch.

Yield: approximately 30 cookies


Christmas Cookie List

I’ve been quite an absent blogger lately. I promise I am still alive! I’m hoping to put together a last minute Christmas cookie countdown in case any of  you are looking for a couple more recipes, but until I get to that later today, I’ll leave you with my Christmas cookie list. I’ll add links for the ones that I’ve already posted. Enjoy!

1) The Best Rolled Sugar Cookies with Decorator Frosting

2) Peanut Butter Temptations

3) Andes Peppermint Crunch Chunkies

4) Dad’s Milk Chocolate Fudge

5) Pomegranate White Chocolate Chunk Cookies

6) Peppermint Marshmallows

7) Oreo Cheesecake Cookies

8) Soft Gingersnap Cookies with White Chocolate Chunks

Sounds like quite a list. Anyone want to come over?

Bloggers: Shutterfly Holiday Card Giveaway!

Do you have your Christmas cards picked out yet? This is actually the first year since we’ve been married that we’re going to send out cards. In years past with final exams looming, they always ended up being one of those things that got nixed. With everything that has changed in our lives in the past 6 months, I am actually really excited to get to design and send out my first Christmas card!

From other cards that I have received, I really like when others have personalized their cards with photos. It’s always fun to get to “see” people that you haven’t been able to meet-up with in person for months or maybe years. The other thing that I would like in my card design is some space to personalize a message. Well, the folks from Shutterfly have the perfect solution. They are offering 50 free holiday cards to bloggers who write a blog post about their products. Not only can I get a photo card, but they also offer folded photo cards so that there is some space for a message inside!

Check out some of the awesome holiday photo card ideas that they have. It’s going to be hard to choose! Here are a few as just a preview of the options that they have to offer!

 Be sure to head over to Shutterfly when you are preparing for those holiday cards. They’ve got photo cards, holiday cards, and calendars all for a new year! Early Happy Holidays to you!

Cut-Out Sugar Cookies

Mortars and pestles… not just for mojitos 🙂

As soon as I saw these cookie cutters, I knew I had to have them. My husband graduated from pharmacy school last week, and we made these cookies for his reception. I made the cookies after work one night, and he helped me decorate them the next. All the names on the vial cookies are actual medications. The challenge was to find names that were short enough to fit on the cookie 🙂

I have made this sugar cookie recipe from allrecipes.com for several years. I think I may have found it back in high school one year when my husband (then boyfriend) and I decided to make cut-out cookies for Christmas. I really can’t think of a complaint about this recipe. The dough has never been sticky, it really doesn’t need to be chilled before rolling out the dough, and they bake up firm enough to hold their shape while staying soft for days. Perfect in my book.

For frosting, I’ve always made a quick buttercream using just butter, vanilla, a splash of milk, and powdered sugar. There are no real measurements. I just add powdered sugar until it’s the consistency I want. If it gets too thick, just thin it with a little bit of milk. We used a bottle of decorators fondant that I got from the craft store for the writing. I have yet to try royal icing although I always envy the beautifully decorated cookies that others make! That may be next on the list 🙂

(Printable Recipe)

The Best Rolled Sugar Cookies
Adapted from http://www.allrecipes.com

Ingredients:
1-1/2 c. butter, softened
2 c. white sugar
4 eggs
1 tsp. vanilla extract
5 cups all-purpose flour
2 tsp. baking powder
1 tsp. salt

In a large bowl, cream together butter and sugar until smooth. Beat in the eggs one at a time. Beat in the vanilla. Stir in the flour, baking powder, and salt. The dough can be chilled up to overnight. I don’t chill it. I’ve never found it needed to be chilled.

Preheat the oven to 350 degrees F. Roll out dough on a floured surface to 1/4-1/2 of an inch thick. Cut into shapes with any cookie cutter. Place cookies on an ungreased cookie sheet. Bake 7-9 minutes in the preheated oven until cookies no longer look “wet.” If they start to brown on the edges, you cooked them a little long. Cool completely before decorating. 

Andes Peppermint Crunch Chunkies

I’ve been quite late getting my Christmas recipes up, but I wanted to add these to the mix before it got too much later 🙂  As far as I’m concerned, peppermint season extends through the winter anyway, and these could be great Valentine’s Day cookies because of the colors.
The recipe comes from the back of the Andes Peppermint Crunch Baking Chip bag. This isn’t the first time that I’ve made these cookies. I made them first 2 years ago but couldn’t make them last year as I couldn’t find the chips. I was a little disappointed because we made them a couple of times that first year because we really enjoyed them. The stores always seem to have the chocolate variety, but the peppermint chips seem to be a little harder to find.
Anyway, we were wondering through the grocery store sometime around Thanksgiving and I snatched these up as soon as I saw them. It actually turned out to be a good thing that I had them because I was able to use the chips to try out my new Christmas present from the hubby – a Bright Red KitchenAid!!  Getting that as my Christmas gift was a pretty good surprise, and yes, I had to break it in the first night I had it 🙂
So yay for the chips and yay for the KitchenAid. If you can find these around the holidays, I would definately recommend picking up a bag. You may never know when you’ll  have to try out a new mixer 🙂
Andes Peppermint Crunch Chunkies
From Andes Peppermint Crunch Baking Chip Bag
Ingredients:
2 sticks unsalted butter, softened
1 c. brown sugar, packed
1/3 c. granulated sugar
1 lg. egg
2 tsp. vanilla
1/2 tsp. baking soda
1/2 tsp. salt
1-3/4 c. all-purpose flour
1 c. old-fashioned oats
1 c. sweetened grated coconut
1-1/2 c. Andes Peppermint Crunch Baking Chips
Preheat the oven to 300 degrees F. Using an electric mixer, cream the butter and sugars until fluffy (about 3 minutes). Beat in egg and vanilla extract. On low speed, add baking soda, salt, and then flour. Mix completely. Stir in oats, coconut, and Andes Peppermint Crunch Baking Chips.
Form approximately 1-Tbsp. worth of dough into a rounded ball. Place each ball of dough 2-inches apart on a prepared cookie sheet. Press down lightly. Sprinkle some of the remaining chips on top of each cookie if desired. Bake for 10-15 minutes or until just light brown on the edges. Do not overbake. Remove from cookie sheet and let cool on a wire rack.
Yield: approximately 60, 1-1/2″ cookies

Macaroon Kisses

Finally the post for the cookies that everyone has been asking me about. I originally picked this recipe out from tasteofhome.com because my husband LOVES coconut. They looked like something that would be right down his alley, and they would also add something different to our traditional Christmas cookie spread.
Fast forward several exams, a rushed trip home, and a snow storm later, I was making these cookies in my mom’s kitchen with the kisses and coconut that I had shoved in my purse on the way out the door. I was THAT determined to make them. Thankfully, they turned out to be worth the extra effort. My brother, dad, and husband were gobbling them down as fast as I made them!
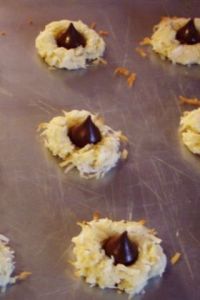
I’m not entirely sure why the cookies are called “macaroons.” The ingredient list more closely resembles a traditional cookie recipe, and the recipe calls for an egg yolk rather than egg whites. Anyway… if you like coconut, these are great. Even hot out of the oven (when my dad likes cookies the best). Speaking of that, mine did need several minutes out of the oven to set up. The cookies are quite crumbly while warm. That and the chocolate kisses will get soft, but nothing a few mintues out in the garage in this weather won’t fix (it was -13 degrees F when we woke up this morning)!!!  Enjoy!
Macaroon Kisses Adapted from Taste of Home
1/3 c. butter, softened
3 oz. 1/3-less fat cream cheese, softened
3/4 c. sugar
1 egg yolk
2 tsp. almond extract
1-1/2 c. all purpose flour
2 tsp. baking powder
1/2 tsp. salt
5 cups flaked coconut, divided
48 milk chocolate kisses
In a large bowl, cream the butter, cream cheese, and sugar until light and fluffy. Beat in egg yolk and extract. Combine the flour, baking powder, and salt; gradually add to creamed mixture and mix well. Stir in 3 cups coconut. Cover and refrigerate for 1 hour (I skipped this).
Roll into 1-inch balls and roll in the remaining coconut. Place 2-inches apart on ungreased baking sheets. Flatten balls of dough slightly with fingers.
Bake at 350 degrees for 10-12 minutes or until lightly browned. Immediate press a chocolate kiss into the center of each cookie. Cool on pan for 2-3 minutes or until chocolate is softened. Remove to wire rack to cool completely.